
We’ve released ManicTime v2026.1 Beta for Cloud (ManicTime Server), Windows, Mac, and Linux. If you decide to give it a try, we’d appreciate any feedback.
Cross-platform highlights
MCP Server (all clients)
You can now connect ManicTime client to your favorite AI tool via MCP. We’ll publish a separate post with a full walkthrough, but here are short instructions on how to connect and use it:
Visual Studio Code
Open Visual Studio Code, then:
Type Ctrl-Shift-P (Cmd-Shift-P on Mac) then choose "MCP: Add Server".
Choose "Command (stdio)"
Enter the path to the executable (in double quotes) followed by mcp. For example:
"C:\Program Files\ManicTime\ManicTime.exe" mcp
Or on Mac:
"/Applications/ManicTime.app/Contents/MacOS/ManicTime" mcp
For name put ManicTime.
Once done mcp.json will open up with ManicTime defined as:
"ManicTime": { "type": "stdio", "command": "C:\Program Files\ManicTime\ManicTime.exe", "args": [ "mcp" ] }
Now click on Copilot chat icon

and ask it for ManicTime data, like
Connect to ManicTime and get list of applications I used today
Connect to Anthropic Claude Code
Windows
claude mcp add manictime-client --transport stdio -- "C:\Program Files\ManicTime\ManicTime.exe" mcp
Mac
claude mcp add manictime-client --transport stdio -- "/Applications/ManicTime.app/Contents/MacOS/ManicTime" mcp
Connect to OpenAI Codex
Windows
codex mcp add manictime-client -- "C:\Program Files\ManicTime\ManicTime.exe" mcp
Mac
codex mcp add manictime-client -- "/Applications/ManicTime.app/Contents/MacOS/ManicTime" mcp
Once connected, you can ask questions like:
- "How much time did I work today?"
- "Which apps was I using?"
WebP screenshots (Cloud/Server and all clients)
WebP is an image format that typically provides better quality than JPG at smaller file sizes. On new installations, WebP is now the default screenshot format. The same option is also available on Mac and Linux, but the setting needs to be set on cloud/server, Administration, Client settings.
If you use Cloud / Server, an administrator can enforce WebP via Administration, Client Settings.
Note: If you force WebP, clients older than v2026.1 will stop taking screenshots. Only enable this if all clients are v2026.1 or newer.
Copy tags to autotags – overwrite behavior (Cloud/Server and Windows client)
In AutoTags, there’s an option to Copy tags to autotags. The idea is simple: sometimes autotags are wrong (or maybe you want to provide additional data). When this happens you can adjust autotags manually by creating tags and overriding autotags.
In versions 2025.2 and older, copied tags could still be modified by autotag rules (Append, Prepend, Absorb, etc.). After feedback from users, we changed the default behavior in v2025.3 so copied tags overwrite AutoTags exactly as-is. However, some users relied on the old behavior, so now you can choose.
In AutoTag Editor -> Copy tags to autotags, you can select:
- Overwrite AutoTags (as was changed in v2025.3)
- Overwrite AutoTags, then apply Append / Prepend / Absorb (as it worked in all versions up to v2025.2)
You can configure this in autotag editor on Cloud / Server and in Windows client.
Cloud / Server changes
Major improvements to day view
Day view received a large set of updates focused on layout, spacing, and better consistency with the Windows client.
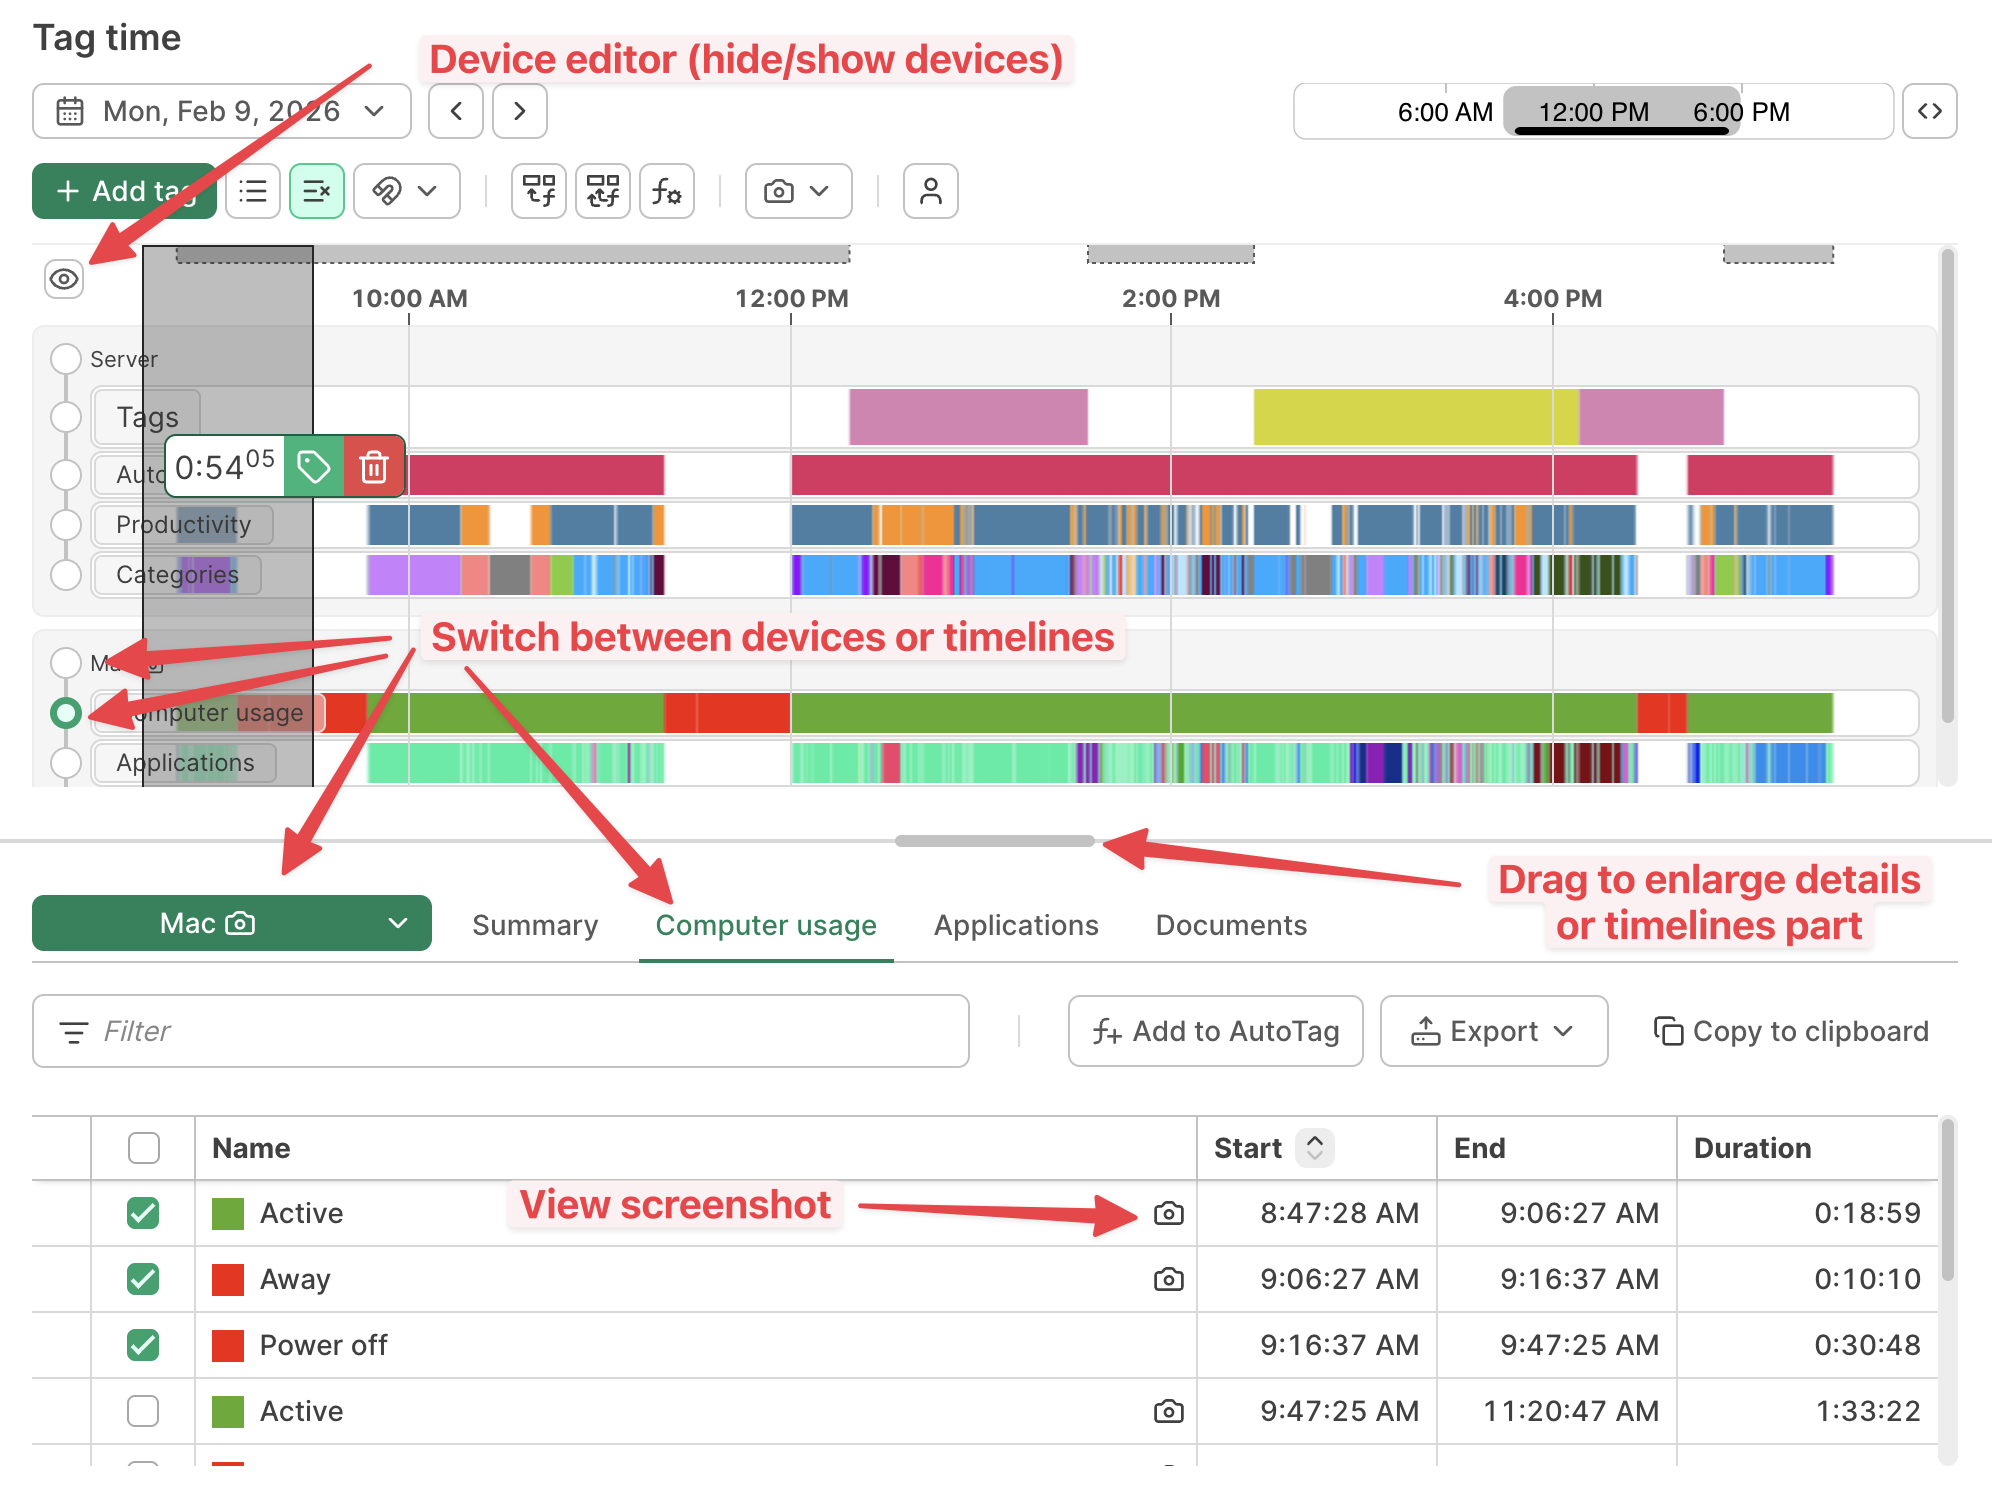
Highlights:
- Improved layout and spacing, closer to the Windows client look-and-feel.
- Timelines stay visible while tagging/editing in the details section below.
- Each activity in the details can show a preview of the first screenshot when you hover the camera icon.
- You can switch between timelines with radio buttons while keeping the current selection.
- The timelines area is now resizable (scrollbar appears when needed).
- Device editor was moved to the eye icon above the timelines (same placement as the Windows client).
Switch devices/timelines in two ways:
- Use the radio button next to a device or timeline in the timeline list.
- Choose a device from the dropdown, then use tabs to switch timelines.
Productivity & Categories redesign
Productivity and Categories were redesigned with a new breakdown view that shows exactly how the total is calculated.
Jira support (on-premise)
Added Jira OAuth support for on-premise (useful when both Jira and ManicTime are hosted internally).
Other improvements
- Personal Cloud now supports a device picker, making it easier to switch between devices when reviewing data.
- Bug fixes and stability improvements
Download: ManicTime Server v2026.1 Beta
ManicTime Windows changes
UI modernization continues
The UI modernization continues with new themes and updated design system components: buttons, alerts, banners, badges and typography plus improved Compact and High Contrast support.
We also improved the first-start experience:
- Comfortable and Compact layouts now adapt better to screen size on first start.
- On smaller screens, ManicTime will automatically switch to a more suitable layout (Compact) instead of defaulting to Comfortable.
Other improvements
- Statistics: Top reports can show up to Top 100 results.
- Timesheet: now remembers the last selected sort.
- Document tracking: added support for Rhino and Matrix.
- Bug fixes and stability improvements
Download: ManicTime for Windows v2026.1 Beta
ManicTime Mac and Linux improvements
- MCP server added (you can connect it to AI agent)
- WebP screenshot format option (can be set from Cloud / Server via Administration -> Client Settings)
- Bug fixes and stability improvements
Download: ManicTime for Mac v2026.1 Beta
Download: ManicTime for Linux v2026.1 Beta
As always, this beta is a chance to test changes before the final release. If you run into issues or have feedback, please let us know—every report helps improve the final version.