Simple Autotags
In a previous blog post, we explored advanced autotags. But then we realized, that most of you would probably benefit more from just going over the basics, not starting with trying to decode the Matrix. So let me share a few tips on how we, at ManicTime, use them.
How Autotags Are Different from Tags
Let's first examine how we see the distinction between tags and autotags. Autotags are more general, while tags can be more specific. Using autotags, I can easily say I worked for a specific client or even on a project. But it is much harder to know which task I worked on.
Imagine you’re a lawyer working on a Word document. The file is named after the case and stored in a folder labeled with the client’s name.
For example, let's say this is the path of the document:
c:\work\ACME\Client agreement.docx
Using this data, the autotag could be ACME, Client agreement. But if we create a tag, we could make it more specific, like: ACME, Client agreement, Outline with a comment: Drafting an outline of a new client agreement. There is no way to get this additional information from tracked data.
Autotags help track general work contexts, while manual tags can capture detailed tasks. But autotags will still help with manual tags, because they will indicate the time at which you worked on specific projects.
Setting Up Autotags
The following instructions are for Windows version. The same thing can be done on the cloud (or ManicTime Server)
First, we will start with the things that are set in stone. Imagine your client and project names - these are your keywords. Some of these keywords can be found on the Documents timeline, while others will be found on the Applications timeline. To see timeline details, click on it to select it.
Now we are ready to create some autotags. I suggest you look at the data on the Documents and Applications timelines. If you write a keyword in the filter below, which timeline shows you more results? That is the one to first work on. Then:
- Type all the different client names or project names into the filter below (you should see some results for the keyword).
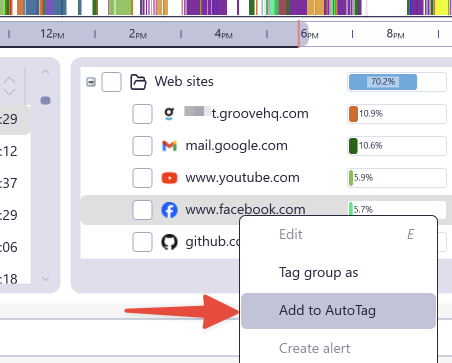
- Each time, click on the down arrow on the right side of the filter and choose Add to autotag.
- Use an autotag like Work, client or project name

Repeat this until you cover all clients and projects you worked on today. You can also repeat it on the other (Documents or Applications) timeline.
Do this for the past couple of days, so you get most of your recent work.
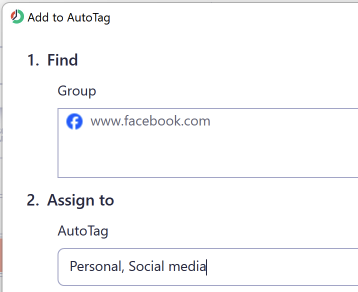
Now click on the Documents timeline and look at the most used sites in the bottom right corner. For any sites you use for personal purposes, right-click on them and assign them to Personal, something for example:
facebook.com → Personal, Social mediacnn.com → Personal, News
Do this only for sites or applications which are always the same autotag. So youtube is always Personal, Media, unless you also use it for work. If you do, then leave it for now and just concentrate on the ones which are crystal-clear into which autotag they belong.
Work and General Tools
There are a lot of apps and websites which can be used for anything, for example:
- Windows Explorer
- Google.com
- ChatGPT
These can be used for anything, work or personal. Assign any application or site that can be used for anything to the General autotag.
Some can only be used for work. For example, in the case of lawyers:
- Westlaw
- LexisNexis
These resources are only used when working, but you can't say to which client or project they belong. Today you use them for one client, tomorrow for another. Assign any application or site used solely for work, but for different clients or projects, to the Work, Tools autotag.
Example:
- Windows Explorer: Click on the Applications timeline, then right-click on Windows Explorer in the bottom right corner and assign it to the General autotag.
- Westlaw: Click on the Documents timeline, then find Westlaw.com in the bottom right corner, right-click on it, and assign it to the Work, Tools autotag.
Absorb
For the General and Work, Tools autotags, we will use a slightly advanced feature: Absorb. The name may seem unusual, but what it does is almost magical (sorry Apple if we infringed on your trademark).
Steps:
- Open the Autotag Editor (click the down arrow on the left side of the Autotag timeline).
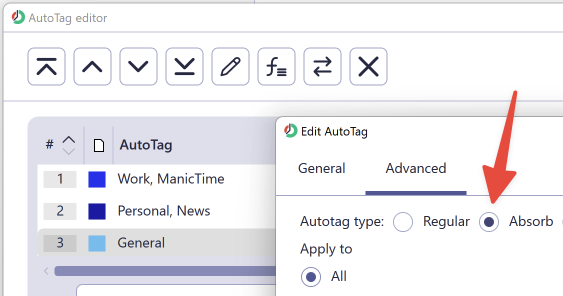
- Right-click on the General autotag and choose Edit.
- Go to the Advanced tab, and for the Autotag type, choose Absorb with All.
- Repeat this for the Work, Tools autotag. This time, after choosing Absorb, click Selected and choose all work-related autotags.
What Absorb Does
Absorb ensures that any time you use these tools, ManicTime will look at the neighboring autotags and assign the time to them.
For example, let's say this is tracked data:
- MS Word → Working on case document
- Westlaw → Research
- MS Word → Working on case document
With Absorb enabled, the Westlaw session will be autotagged the same as the surrounding Word activity.
Remember: Put as many applications or web sites into autotags which are not absorbed and put into absorbed autotags only the tools which are used for different projects or tasks!
Additional Settings
Resolve Overlaps
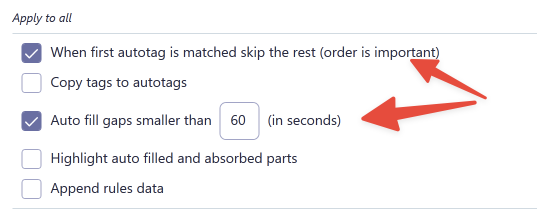
By now, some autotags may overlap. Open the Autotag Editor, select When first autotag is matched, skip the rest, and reorder your autotags by importance. This ensures only the most relevant autotag is applied.
Fill Small Gaps
You will likely have many small gaps - tools you used for just a few seconds or websites you visited only once. To automatically fill these gaps, check Auto-fill gaps smaller than... in the Autotag Editor. This will fill the gaps with neighboring autotags.
Don’t Be Afraid to Experiment!
Autotags are simple to create. You should be able to cover 90% of your work in minutes. Knowing this, I suggest you experiment. Build autotags once, and if you do not like them, just delete all autotags and start again.
Wrapping Up
This would be a basic usage of autotags, which you should be able to set up in about 10 minutes. Decide if you want to manually tag the remaining details or leave smaller gaps as they are. If needed, dive deeper into untagged details and create additional rules.