This time, we’re going a bit more technical.
Setting up ManicTime Server with the included SQLite is simple, but we only recommend the SQLite version for single users. For a team of users, we suggest you use either MS SQL or PostgreSQL.
Setting up ManicTime Server with PostgreSQL traditionally involves:
- installing PostgreSQL
- creating the database
- configuring ManicTime Server
- connecting everything together
In this guide, we’ll show you how to run ManicTime Server with PostgreSQL using Docker.
Why Use Docker?
Docker makes everything simpler:
- Consistent across platforms (Windows, macOS, Linux)
- No need to install PostgreSQL or ManicTime Server on your machine
- Everything is isolated in containers
- Easy to clean up when you're done
Prerequisites
Before starting, make sure you have:
- Docker Desktop installed (includes Docker + Compose)
- Internet connection to pull images
Step 1: Create a folder for ManicTime settings
Create a folder where ManicTime Server can store its data and configuration.
On Linux/macOS:
mkdir -p ~/manictime-data
cd ~/manictime-data
On Windows (PowerShell):
mkdir "$HOME\manictime-data"
cd "$HOME\manictime-data"
Or if you're using WSL:
mkdir -p /mnt/c/Users/<YourUsername>/manictime-data
cd /mnt/c/Users/<YourUsername>/manictime-data
Step 2: Create a Docker network
Docker network ensures ManicTime Server can communicate with PostgreSQL by container name.
docker network create mt_network
Step 3: Start the PostgreSQL container
Replace YourStrongPassword123! with your desired password:
docker run -d \
  --name mt_postgres \
  -e POSTGRES_USER=mtadmin \
  -e POSTGRES_PASSWORD=YourStrongPassword123! \
  -e POSTGRES_DB=manictime \
  -p 5432:5432 \
  --network mt_network \
  postgres:15
Step 4: Create the required databases
Wait a few seconds for PostgreSQL to start, then run the following command to create the ManicTimeCore and ManicTimeReports databases:
docker exec -it mt_postgres psql -U mtadmin -d postgres -c "CREATE DATABASE \"ManicTimeCore\";"
docker exec -it mt_postgres psql -U mtadmin -d postgres -c "CREATE DATABASE \"ManicTimeReports\";"
Step 5: Create the settings file
ManicTime Server needs a settings file to know how to connect to PostgreSQL. Create the file ManicTimeServerSettings.json in ~/manictime-data folder, with contents (download file):
{
    "database": {
        "provider": "PostgreSql",
        "connectionString": "Host=postgres; Port=5432; Database=ManicTimeCore; SSL Mode=Prefer; User Id=mtadmin; Password=password;"
    },
    "reporting": {
        "database": {
            "provider": "PostgreSql",
            "connectionString": "Host=postgres; Port=5432; Database=ManicTimeReports; SSL Mode=Prefer; User Id=mtadmin; Password=password;"
        }
    }
}
Replace password with your chosen password.
Step 6: Run the ManicTime Setup
On Linux/macOS:
docker run --rm \
  --name mt_setup \
  --network mt_network \
  -v $(pwd):/app/Data \
  -p 8080:8080 \
  --entrypoint dotnet \
  manictime/manictimeserver Setup.dll -publicurl
On Windows (PowerShell):
docker run --rm ^
  --name mt_setup ^
  --network mt_network ^
  -v ${PWD}:/app/Data ^
  -p 8080:8080 ^
  --entrypoint dotnet ^
  manictime/manictimeserver Setup.dll -publicurl
You will see output like this:
Listening on: http://localhost:8080/e6dd2471019e45ada6a0ed67da7e93f8
Press Ctrl+C to stop.
Copy and open that URL in your browser.
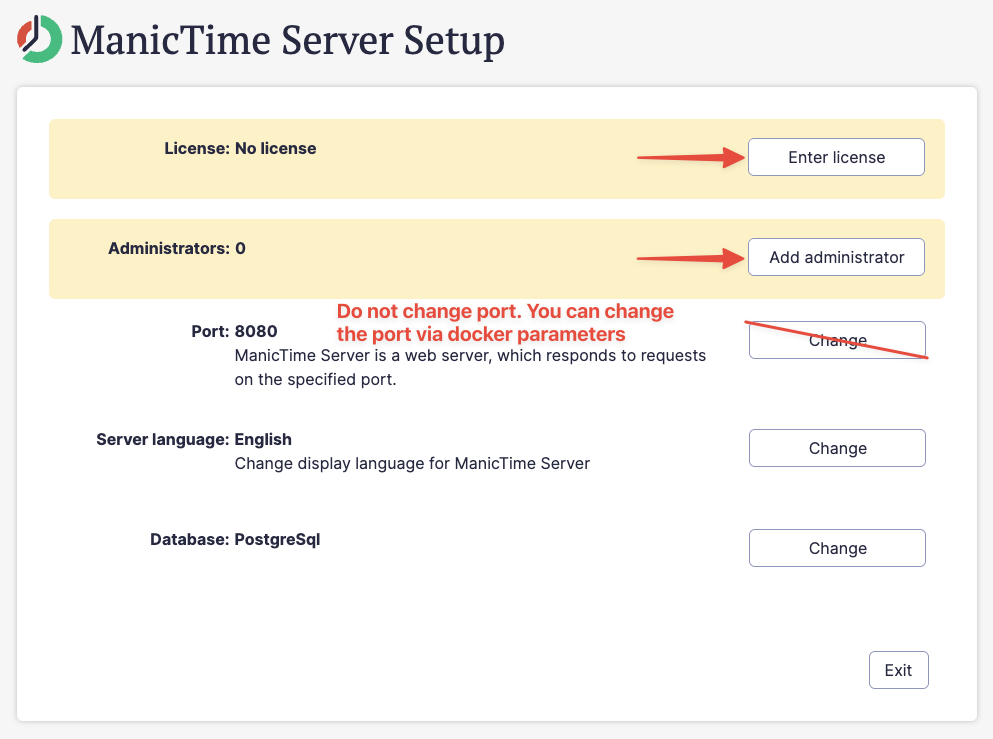
Step 7: Complete setup in browser
- Set up an administrator account
- Choose trial or enter a license key
- Do not change the port (port is part of the Docker run command)
After setup, close tab and press Ctrl+C in the terminal to stop the container.
Step 8: Run the ManicTime Server
Now that setup is complete, you can run the actual server.
On Linux/macOS:
docker run -d \
  --name mt_server \
  --network mt_network \
  -v $(pwd):/app/Data \
  -p 8080:8080 \
  manictime/manictimeserver
On Windows (PowerShell):
docker run -d ^
  --name mt_server ^
  --network mt_network ^
  -v ${PWD}:/app/Data ^
  -p 8080:8080 ^
  manictime/manictimeserver
Visit http://localhost:8080 and log in using the admin account you created.
Optional: Use a different port
If you want ManicTime Server to run on a different port, change the -p flag.
For example, to run it on port 9090 instead of 8080:
On Linux/macOS:
docker run -d \
  --name mt_server \
  --network mt_network \
  -v $(pwd):/app/Data \
  -p 9090:8080 \
  manictime/manictimeserver
On Windows (PowerShell):
docker run -d ^
  --name mt_server ^
  --network mt_network ^
  -v ${PWD}:/app/Data ^
  -p 9090:8080 ^
  manictime/manictimeserver
Then visit http://localhost:9090 or the port you selected to access ManicTime Server.
Done!
You now have:
- PostgreSQL running in a container
- ManicTime Server running in a container
- Configuration stored locally in
~/manictime-data/ManicTimeServerSettings.json
Troubleshooting
Port 8080 already in use?
This means another application is already listening on that port.
On Linux/macOS:
lsof -i :8080
kill -9 <PID>
On Windows (PowerShell):
netstat -ano | findstr :8080
Then find the PID in Task Manager and stop the corresponding process.
Or simply change the port when starting the ManicTime Server container (see Use a different port section above).
PostgreSQL not reachable?
- Make sure
mt_postgresis running:docker ps - Inspect logs:
docker logs mt_postgres
Want to clean everything up?
docker stop mt_server mt_postgres
docker rm mt_server mt_postgres
docker network rm mt_network
Conclusion
With Docker, you can set up ManicTime Server with PostgreSQL quickly and consistently across platforms. Whether you're running on Windows, macOS, or Linux, this approach keeps your environment clean, easy to manage, and reproducible.